Essential Information
White Paper on Wind Tunnel Safety
[the_ad_placement id=”article-above-content-mobile-only”]
Table of Contents
- Abstract
- Safety Matters: Accidents Hurt – Safety Doesn’t
- Short History of Safety in the Wind Tunnel Industry
- Modern Safety Features
- Primary Level Safety
- Secondary Level Safety
- Diffuser Size
- Safety Lines
- Air Flow Quality
- Net Elasticity
- Light sensors
- Shape
- Conclusion
Abstract
This white paper discusses wind tunnel safety.
This paper aims to inform flyers of the varying safety features tunnels may have and their relative importance.
Furthermore it aims to spark a conversation within the industry regarding safety in an effort to develop and improve current standards. Wind tunnels have a lack of incentives when deciding on how much to invest in safety. It is our belief that if flyers recognize the importance of safety and act accordingly, the sport will in its entirety become safer and have a more sustainable growth.
Safety Matters: Accidents Hurt – Safety Doesn’t
If you are a skydiver (and even if you are not) you know that safety matters. Unfortunately though all safety procedures come at a cost: they cost us time, money and effort. It’s up to ourselves to decide how much we’re willing to invest in safety. If we don’t invest enough, we’ll get injured. It’s that simple. (Please read Bill Booths excellent article “Do Skydivers Care About Safety“ where he explains why spending less on safety can get you in trouble.) In the same way, dropzones and wind tunnels have to decide how much to invest in safety for the staff and customers.
Short History of Safety in the Wind Tunnel Industry
Wind Tunnels have been around for about 40 years, with a constant improvement of the technology and safety. However it wasn’t until approximately 10 years ago that safety was really focused on. This is not surprising considering that from 1978 until 2005 there were only 7 wind tunnels in the world. Today there are over 120 operational wind tunnels globally.
Today there are two major institutions promoting safety:
- Primarily in the USA, the International Bodyflight Association
- Primarily in Europe, it is the Tunnel Instructor Organisation
In the past few years, tunnels have began to focus a bit more also on providing a higher level of comfort for customers, as well as lowering energy consumption rates to lower the cost of operation. For a better understanding of the evolution, we can separate tunnels into 4 generations. The scope of this paper is to analyze the safety features present in the 3rd and 4th generation tunnels.
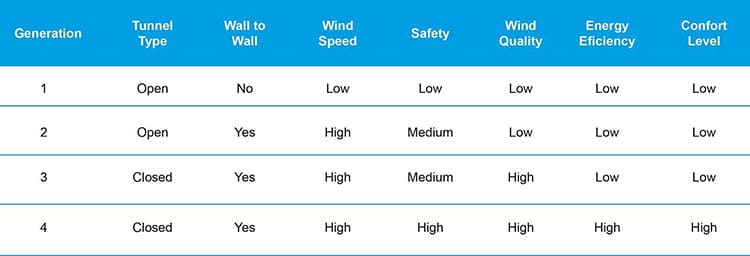
The tunnel generation is defined by if a tunnel meets certain conditions and characteristics that define a tunnel of its generation. We separated the wind tunnel characteristics into 7 main categories. If a tunnel meets at least 6 of those, it can generally qualify as a tunnel of that generation.
- Tunnel Type refers to if the tunnel is recirculating or not, which means if the wind is sucked constantly from outside the tunnel (Open Circuit), or if it’s reused in a closed circuit.
- Wall to Wall refers to a tunnel having a flight chamber. Initially tunnels didn’t have side walls, they were essentially nets over large fans.
- Wind Speed separated tunnels in what type of flying can be done in that tunnel under modern standards. In most open tunnels it is nearly impossible to fly any freefly due to the slower wind speeds.
- Safety refers to the safety features that the tunnel has. This white paper aims to expand the general understanding of current safety features so as to better understand what makes a wind tunnel safe.
- Wind Quality refers to how turbulent or laminar the air flow of the wind tunnel is.
- Energy Efficiency relates to how much electricity the engines of the wind tunnel require to achieve a given wind speed.
- Comfort Level refers to how comfortable and convenient the tunnel is for customers.
Modern Safety Features
Sure enough, when you choose a tunnel to train in, you want it to be a safe one. Naturally you also want it to be cheap as chips. But what is the trade off? What makes a tunnel safe?
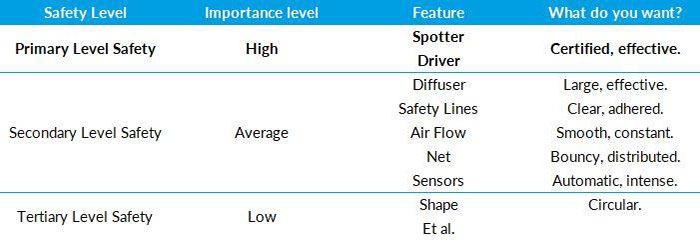
Here is an overview, within this article we will briefly explain what each measure means.
Primary Level Safety
We’ve reached a point where almost all tunnels can guarantee a basic level of safety. Most wind tunnels built today are 3rd or 4th generation tunnels, which means they are inherently safer than previous tunnels. The two most basic safety rules that almost always are followed in all tunnels are:
- Always have an appropriately trained spotter at the door.
- Always have an appropriately trained driver in the driving booth.
There are a few details and caveats to these rules, but we can accept them on their premise. You always want to have a certified, effective spotter at the door and a certified, effective driver in the driving booth. What does effective mean? It means that the person in able to pay close attention to you. They should be able to stay focused on you comfortably, without being too tired or having too many distractions.
“OK, that makes sense” you’ll think, “all the tunnels I fly at follow these rules. What else is there?”
Glad you asked.
Secondary Level Safety
4th generation tunnels have higher safety level features that are relatively new. It’s a bit like when seat belts or airbags first came into existence. In the beginning they were considered a “weird” additional safety feature that hardly anyone used. However it soon became a minimum requirement for any car to be considered safe.
In this paper we’ll introduce you to modern safety features that aim to decrease the probability of injury. These are: Diffuser Size, Safety Lines, Air Flow Quality, Net Elasticity and Lights sensor.
1. Diffuser Size
The diffuser is the part of a flight chamber that makes it slightly wider than the rest of the chamber. In the following drawing you can clearly see what a diffuser looks like and how it acts. Diffusers are used to lower wind speeds within the flight chamber. This is done to protect flyers that use the highest wind speeds. In some transitions or bailouts they might end up in a flat posture, which will shoot them up through the entire chamber, unless they recover their vertical position fast.
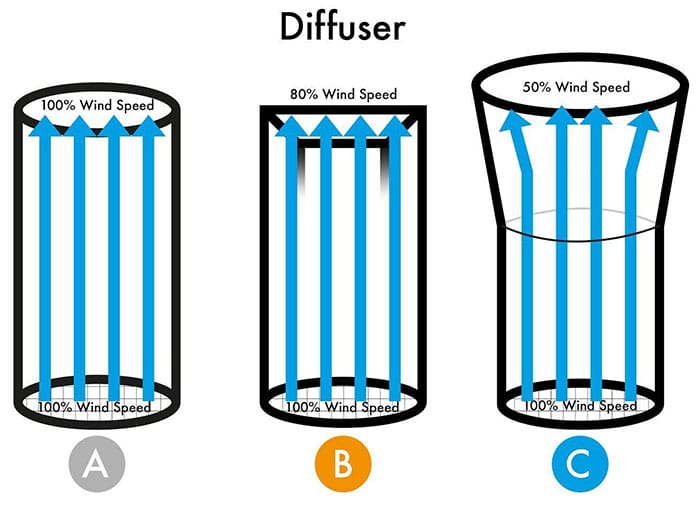
Having no diffuser (A) means that there is no deliberate wind speed decrease throughout the flight chamber. This in turn means that if you are flying at high speed in any tunnel (head down speeds) and you do complicated maneuvers, you might accidentally end up in belly or back for longer than intended, and in turn shoot up through the chamber. In an extreme case, it is possible for a flyer to touch the top turning vanes, or even crash into them. The vanes are not particularly dangerous in themselves. However crashing into a metal wall, regardless of how smooth it may be, is not something you’d do in your spare time.
In some cases tunnels don’t have a diffuser per-se, but do however change from a circular shape to a square shape (B). This is better than having no diffuser, since the corner of the square are “gained”. The bigger the space that air has to fill up, the lower the speeds.
The optimal solution is a cone type diffuser (C) which consistently widens the chamber, increasing the surface area and progressively decreasing wind speed. By decreasing the wind speed to half its speed, flyers will find it impossible to keep flying higher and thus remain in a safe height, with no possibility of crashing into top vents, or even flying at more dangerous heights.
Ideally after the maximum effective width, there should be at least a few more meters of chamber above it, to undo any inertia the flyer has. This means that if a flyer is at high speed at the net and goes into a belly position, he shoots up aggressively, but as soon as the diffuser starts he starts slowing down. Even if the wind speed drops by 50%, the flyer needs a few more meters to stop the upwards movement.
2. Safety Lines
This new concept was introduced by Tunnel Instructor Org in 2016 and is now being adopted in american tunnels too. It essentially consists of 3 safety marks at increasing altitudes of a flight chamber. These lines represent the maximum safe flying height in accordance with the flyers skills.
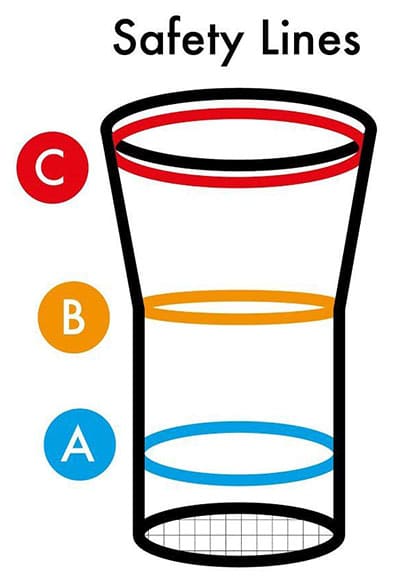
Most accident happen because of the vertical fall of the flyer and not the horizontal push. The lower a flyer is, the smaller the fall, the softer the hit. In short: flying low is safer. Naturally, as with all rules, there are some specific exceptions where a flyer would want to be a bit higher than normal.
This helps customers police themselves and make sure they stay low, as well as spotters enforce a simple rule of flying under a specific line. Without these lines, it was very hard to define how high is safe enough. Furthermore, some wind tunnels apply a financial penalty to anyone who crosses the red line. Unfortunately, one could argue that the only time all flyers take safety seriously is when it hurts their wallets.
For further reading see this article on safety lines.
3. Air Flow Quality
Air flow quality refers to how turbulent the wind is in a wind tunnel. This is the essence of a wind tunnel. All wind tunnel manufacturers are constantly trying to improve and perfect the wind flow. In the following image you can see different airflow qualities, from worst (A) to best (C).
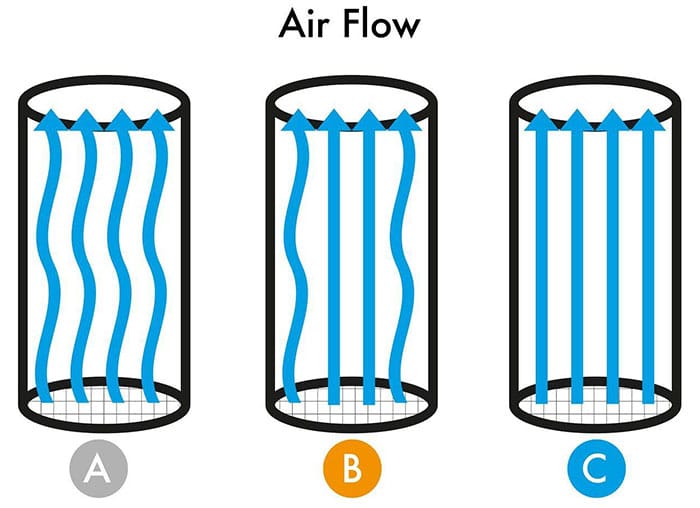
When the air quality is bad (A), flying feels like driving over a bumpy road. We don’t receive a constant, homogeneous wind resistance, which makes our body move in ways we do not want, and forces us to constantly compensate. This results in a far less precise and more exhausting flying, which is counter productive for any flyer. This not only causes more dangerous situations by exhausting the flyers, but also causes a particularly dangerous situation when a flyer makes a mistake and can’t find dense air flow to help him compensate for his mistake, leading him to a more violent fall or even hit.
Think of it as accidentally flying over a formation in the sky. When a flyer accidentally flies over a formation, it’s too late to correct his mistake, as he is then in the burble of the flyers below, and cannot escape the fall on to them. The same thing happens when there are burbles caused by the wind tunnel.
Most 4th generation tunnels have a fairly good air flow, which tends to be a bit weaker close to the walls and/or door (B). This means that as long as coaches try to keep half an eye out for a good positioning of the student and themselves during their training, it should be a good session.
The ideal is to have a very “clean” laminar flow throughout the entire chamber (C). This means that regardless of what wind speed or flying modality is flow, the flyer should find a direct response from the wind. This makes the sessions as smooth and effortless as possible. It goes without saying that flyers will always cause burbles and if a flyer remains stationary in one position for a long enough time, he can affect the quality of the airflow around them, although the better the air flow quality, the harder it will be for flyers to worsen it.
4. Net Elasticity
A feature often overlooked is the net. Whenever a flyer falls, the fall is stopped by something: the net. The net elasticity will often determine the gravity of any injury. Would you prefer landing a two meter fall on a bouncy balloon castle, or on a concrete floor?
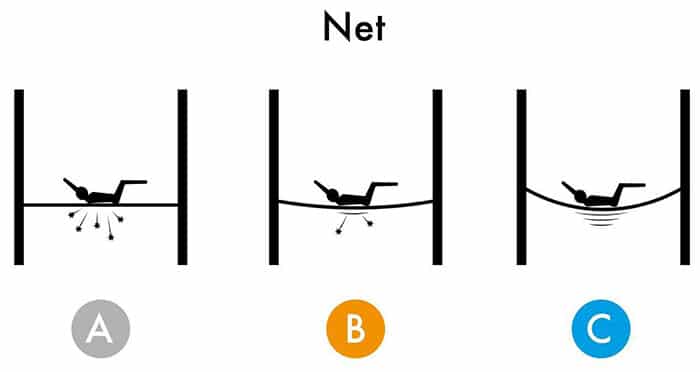
How elastic a net is depends on many factors, all of which are controlled by the manufacturer. Most nets will suffer from two fundamental issues. First, they will lose elasticity as the time passes (months) and secondly they are not equally elastic throughout the entire surface (some are harder closer to the sides).
The worst type of net is a completely rigid net (A). This net is not bouncy and is the equivalent of hitting a hard floor. There are essentially no 3rd and 4th generation type tunnels with this kind of net since it is recognized as a very high risk situation.
The most common type of net is a partially elastic net (B). Although this net is indeed elastic, it suffers from both common problems we mentioned earlier. Firstly, it loses its elasticity in time. This means that every year the net becomes less elastic. This could be fixed by having a more complex and expensive net and a more rigorous maintenance procedure. Secondly, the elasticity is not always spread out evenly throughout the net. Again, a more complex and expensive structure can ensure this, maintaining a high grade of elasticity throughout the entire surface, ensuring that falls on a specific spot of the net do not face a harder net.
The most elastic net type (C) is the ideal, having the most robust technology possible, maintaining a high level of elasticity throughout the entire surface and time of its use. This naturally involves a greater investment but significantly limits the severity of any hit on the net.
5. Light Sensors
Naturally having great spotters and safety lines can only accomplish so much. Flyers should never fly above the red line for their own safety. If they do, the spotter should remind them of the safety hazard and force them to fly lower. However since the spotter is always many meters under, it’s hard to certainly say when a flyer crosses the red line. Also when multiple flyers are flying, a spotter must sometimes decide where to focus his attention and might not realize someone has been flying too high. The perfect solution to this is using automated infrared sensors.
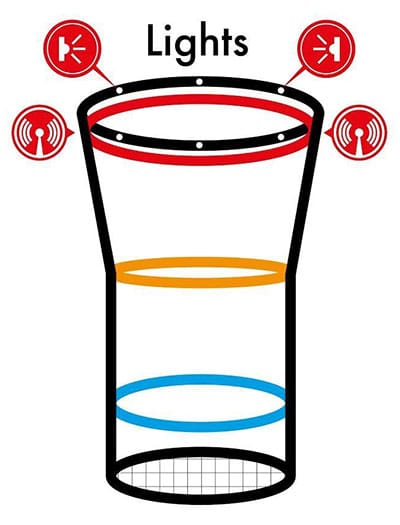
Whenever a flyer crosses the red line, the sensors are activated and the entire tunnel flashes red, which makes it clear to everyone that the flyer has been engaging in dangerous flying. This is similar to the “beer line” concept in skydiving. Some tunnels have even applied expensive penalties to customers that cross the red line, removing 5 minutes of flying time from their account, or directly prohibiting them from flying after one or two warnings.
This concept should apply on all safety lines, but on the top line it’s far more critical. Automated light sensors guarantee that the wind tunnel operator realizes if a flyer is flying dangerous and can instantly resolve the issue.
6. Shape
There are two kinds of tunnel flyers. Those that have hit the wall, and those that will hit the wall. And when you hit the wall, you want to slide off it rather than smack it full force at a 90 degree angle, or even in a corner. The science behind it is simple. Imagine falling on a slide, or falling on a flat surface. Sliding sounds a lot less painful right? Because it is.
Injuries are far less probably in circular chambers rather than polygonal chambers. Furthermore, training is far more comfortable in a circular tunnel for more reasons. Sliding of the wall means a flyer can keep doing his exercise fluently. However getting a foot stuck in a corner will often cause a bailout from the exercise at hand. Think for example when a flyer is learning in-face carving. If his legs hit the corners a couple of times it’s very probable that it forces a turn of his entire body, to a point where the coach has to put too much effort to try to bring him along and thus breaking the exercise. This can also happen in team exercises, where space is scarce. 4-way teams are often forced to drag legs on walls, which is far simpler in a circular tunnel, especially if you have a grip with another member.
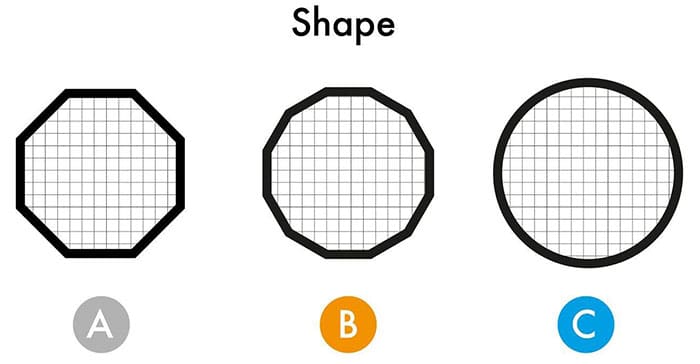
A very common flight chamber shape, especially in older tunnels, is the octagon (A). In time tunnels evolved into using a decagon chamber (B) which is far closer to a circle and enjoys less violent corners. The ideal flight chamber design however is the circle (C ) for all the aforementioned issues.
The main reason manufacturers don’t always make circular tunnels is that they are far more expensive and complicated to make. Not only are they complicated, but also make the rest of the chamber related issues more complicated. Adding a diffuser on a circular chamber is a lot more complex than on a polygonal chamber. Keeping a good airflow on a circular chamber is far more complicated than on a polygonal chamber.
Conclusion
Safety matters. Always. Being safer, improving equipment, doing research, development and training is expensive. The most effective way to get companies to improve on safety is for the customers to show that they appreciate and value safety.
Modern 4th generation tunnels tend to be very safe tunnels. Things relevant to comfort come into play at this level. There is often an overlap between comfort and safety. One good example is the availability of water fountains in ante chamber. Having them eliminates the risk of loose water bottles flying in the chamber, as well as the possibility of a coach or students becoming dehydrated during a camp. This is a comfort feature that shares common ground with safety. However we will gladly write more articles on modern comfort features in issues to come.
Thankfully we live in an age where tunnels are becoming more and more available. Consumers now often have a choice. Tunnels are primarily selected on the basis of price and time availability. We would like to encourage you to start thinking about safety too.
How much more expensive is it to fly in a safe tunnel? How much are you willing to spend for your own safety? Is it worth it ? We think it is…
Published: July 27, 2017 | Last Updated: December 2, 2021
Don’t miss an update!
Join our mailing list for the latest indoor skydiving updates delivered directly to your inbox.
"*" indicates required fields

